New Rooster Form
 For the rooster project, I have been thinking about trying an interference patter based on a rotating mask (I’m working on one with a linear interference mask too).
Electric Rooster had a big round belly which seems like a great candidate. Originally it was to give lots of room for the mechanical parts, attachment of moving parts and have a distance between them. Plus the big fat rooster had a certain chubby look I thought was accessible and cute.
I’ve been thinking about making his belly more round for these past few days and perhaps I could get a rotating moire interference pattern going on his belly.
I spent some time working on this last night. I discovered that by distorting all his parts I could make a skinny yet charismatic rooster. I could try and make that heart into a throbbing animation through an interference pattern. With this his wing is abstracted into the circle and made less relevant.
There is less space but perhaps I could make his belly a little bigger. And there still may be room for animating other parts on this or some other version.
 I put some thought into the mask and it’s very interesting what comes forward.
An second on a clock face is actually 6 degrees since 360/60 = 6.
I could divide each second (6 degrees) into a 1 degree viewing port and a 5 degree mask. This would allow for five frames of animation. And the viewing port is proportionally larger than with the linear one.
I expect the image to be more vivid with the larger viewing port.
This makes me realize how magical the number 60 is and why it was (and is) used as a base for number systems.
When I was younger I thought that base 5 and 10 were the only natural bases for number systems because we had five and ten fingers. The fact that 60 was used puzzled me. For a while I had this idea that there was alternate ways of using your hands to express numbers that could lead to base 60. For instance you could use your right hand to express numbers from 1 to five and your left hand to express fives (like base 5). So you’d have a maximum of 25 on your left hand and then the 5 on your right totaling 30. So that would favor base 30. But in a market situation you could raise your number twice to get to 60. Simply raise all your fingers to show 30 and then raise another number to show from 31 to 60. For a while that was the way I accepted it. So in fact in a trading society base 60 may be even more natural than base 5 or 10 because it can express the numbers needed for basic trade. Eventually I realize that the number 60 is a sufficiently large number for old-day trade.
Plus it divides evenly by so many factors. This is good for trade but it’s especially good for repeating calendars (which can repeat for lunar, solar or stellar cycles) or anything circular or repetetive.
Its still used for measurement of angles (except in mathematics where radians have become popular) and time. 60 Divides by 1, 60 (duh), 2, 4, 5, 6, 12, 15, 30. Makes it easy to divide up a clock face doesn’t it. 🙂 It’s all just bisecting. You only get into trouble dividing the hours into fives (and the quarter hours into thirds). Actually I’ve done this when I was a kid when I made a clock with my meccano set. I also made a base 10 clock figuring it was better and I recall to this day finding it very hard to divide the face into 10 hours with the tools I had. In retrospect I should have just made the face after I made the clock since I could have marked out the 10 hours as the hour hand passed around the clock.

 Rooster Dilemma

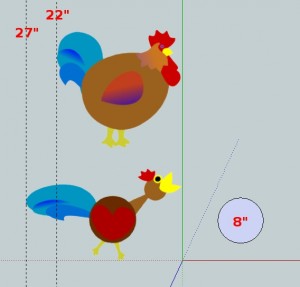
I like both these rooster shapes but I’m figuring out which one I should use.
Chubby Rooster:
- I can make him a little bigger than Electric Rooster (22″ across) which might be fun. Yeah!
- Easy to hang with two points of attachment to the wall. Yeah!
- I have three motors with remote control which I can let the observer control motion. Yeah!
- It’s easy to spin the wing and it doesn’t interfere with the head or tail (the tail is behind the body). Yeah!
- Lots of space to hide all sorts of mechanical behind his chubby body. Yeah!
- He looks like Electric Rooster. Not sure how much of a problem this is.
Skinny Rooter:
- He’s new! Yeah!
- I can make a cool moire effect to make his heart pulsate. That would be super cool. Yeah!
- I’ve not proven the heart will work well and that could be a few hours of work. Also I need quite a bit of gearing since my calculations for the rotary moire effect call for turning between 2 and 5 degrees per second. Ouch!
- I can use the variable speed motor control to change the speed of his heart so the user can do this with the remote. Yeah!
- His parts can be animated too but there isn’t as much space behind him to put mechanical. Ouch!
- He’s sort of skinny and I don’t know where to put hangars. If I put them behind his tail and head then it interferes with motion. Ouch!
Backup Plan:
Interference rooster project.
What to do?
After writing this out I’m leaning towards the chubby design since I already have the remote control worked out.
 I think the best thing to do is make a rooster much like Electric Rooster and have Interference Rooster as backup. I will install one of them and if it needs service I’ll install the other to hold the fort. So by the time the one month show is over both will be stress tested. 🙂
The original plan was to run three motors all with remote control. Each motor would control a different part of the rooster.
I am now considering just using one motor. I’ll work that out as I plan the mechanical and power transmission. I’ll pick the one that’s less work.
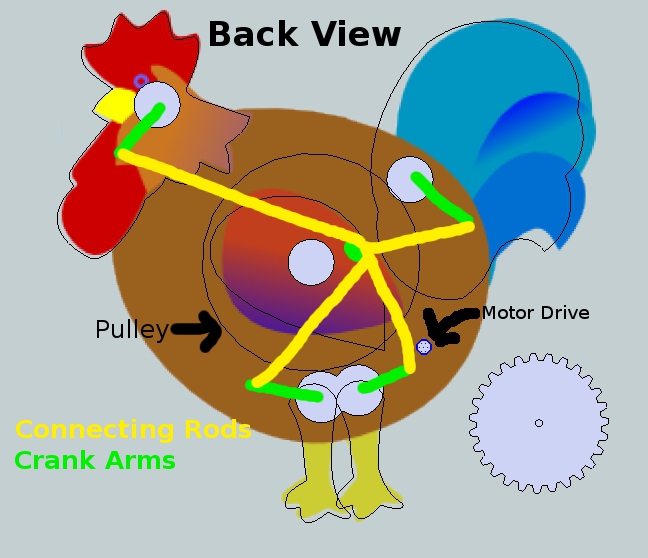
The diagram is showing the proposed points of rotation as grey circles. Each one has a green crank. The motor pulley drives a pulley (large circle) which has a crank. Crank rods are in yellow.
The whole thing would be in sync and the user could change the speed with the remote.
One one hand I could have one motor that drives the whole thing
- spinning wing,
- bobbing head,
- wobbling tail and
- flailing feet.
On the other hand I can have separate motors. Perhaps one for wings and feet, one for head and one for tail. What to do?
Fabrication
I worked on the Remote Rooster (the one that will be remote control). I considered using acrylic paint and I also made a pulley.
Here’s how to make a pulley:
- Cut out two circles.
- Attach them together. In this case I bolted them.
- Mount them on a drill chuck.
- Turn them to a point using a sanding block.
- Remove them from the chuck and glue them together after flipping them so the point become a v-grove.
This works really well. I used this technique for the pulley on the Interference Rooster as well.


I never actually finished this!